
Mechanical keyboards are designed for durability, precision, and comfort, but even the most premium models require regular care. Over time, dust, crumbs, skin particles, and natural oils from your hands settle between the keys and inside the switches. This buildup may seem harmless at first, but it gradually affects both performance and hygiene. Keys can feel sticky, switches may sound different, and typing accuracy can decline.
Unlike standard membrane keyboards, mechanical keyboards have exposed switch mechanisms under each keycap. This design improves responsiveness and longevity, but it also makes them more vulnerable to dirt accumulation. Without proper cleaning, debris can interfere with switch movement, reduce tactile feedback, and even shorten the keyboard’s lifespan.
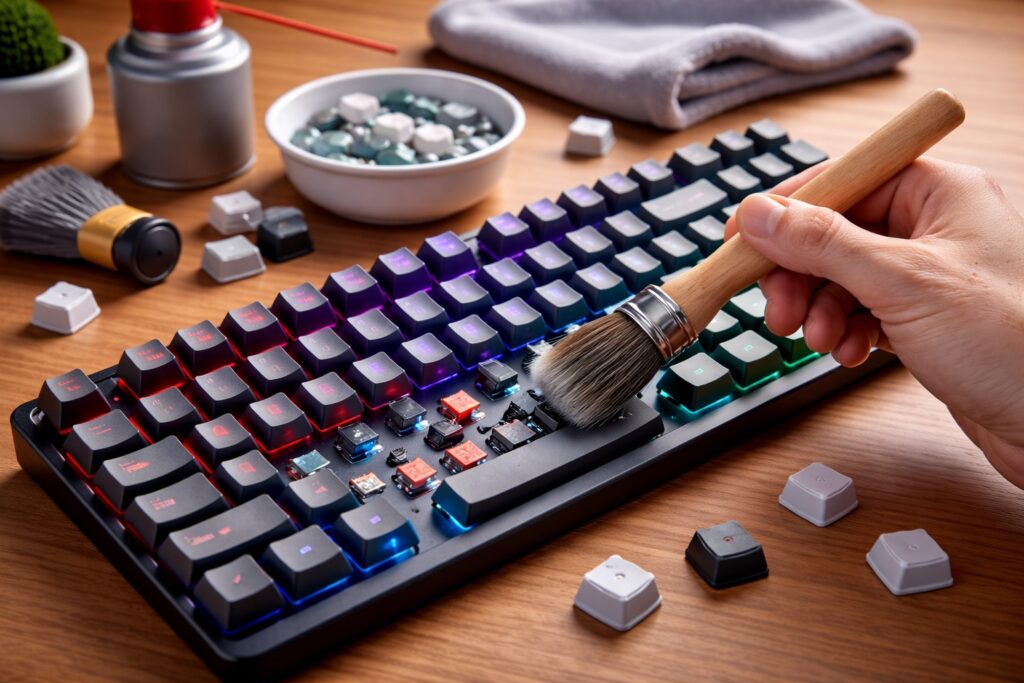
In this complete guide, you’ll learn how to clean a mechanical keyboard the right way, from quick surface maintenance to detailed deep cleaning. Each step is explained clearly and safely, helping you protect your investment and restore that crisp, satisfying typing experience that mechanical keyboards are known for.
Why Cleaning a Mechanical Keyboard Is Essential
Mechanical keyboards are precision tools. Each switch contains internal components such as springs, metal contacts, and housings that rely on clean movement to function properly. When dirt enters these components, it can disrupt the switch’s actuation and reset points.
A dirty keyboard doesn’t just look bad—it performs worse. Keys may begin to feel inconsistent, some may require more force to register, and others might not register at all. Over time, accumulated debris can cause long-term wear on internal parts, especially if combined with moisture or sticky residues from food or drinks.
There is also a hygiene factor. Keyboards are among the most frequently touched objects in any workspace. Without regular cleaning, they can harbor bacteria, allergens, and unpleasant odors. Keeping your mechanical keyboard clean improves both performance and personal comfort, making it an essential habit rather than an optional one.
How Often You Should Clean Your Mechanical Keyboard
The ideal cleaning frequency depends on your usage habits and environment. A keyboard used daily in a home office will accumulate dirt differently from one used in a shared workspace or gaming setup.
For most users, light cleaning should be done every one to two weeks. This includes removing surface dust, wiping keycaps, and clearing debris from between keys. This routine prevents buildup from becoming embedded.
A more thorough cleaning, where keycaps are removed and the keyboard plate is exposed, should be done every two to three months. Deep cleaning involving the keyboard case and internal components is typically needed once or twice a year, or immediately after spills.
Regular maintenance reduces the need for aggressive cleaning later and significantly lowers the risk of permanent damage.
Tools and Materials You Need Before Starting
Preparing the correct tools before cleaning is crucial. Using inappropriate materials can scratch surfaces, erase legends on keycaps, or introduce moisture where it doesn’t belong.
Essential tools include a keycap puller, compressed air, microfiber cloths, a soft brush, cotton swabs, and high-percentage isopropyl alcohol. Mild dish soap and warm water are useful for cleaning keycaps separately.
Avoid paper towels, harsh household cleaners, bleach-based products, or excessive water. These can damage plastic, remove coatings, or seep into sensitive components. Mechanical keyboards are sturdy, but they are still electronic devices that require careful handling.
Quick Surface Cleaning for Regular Maintenance
Surface cleaning is the easiest and safest way to maintain your keyboard between deeper cleanings. Always start by unplugging the keyboard or turning it off if it’s wireless.
Turn the keyboard upside down and gently tap it to loosen crumbs and dust. This simple action removes a surprising amount of debris. Next, use compressed air to blow out remaining particles from between the keys. Short, controlled bursts are more effective than long sprays.
Finish by wiping the tops and sides of the keycaps with a microfiber cloth slightly dampened with water or isopropyl alcohol. This removes fingerprints and oils without introducing excess moisture. Done regularly, this process keeps your keyboard clean with minimal effort.
How to Remove Keycaps Without Causing Damage
Removing keycaps is necessary for deeper cleaning, but it must be done carefully to avoid breaking switch stems or stabilizers. Always use a proper keycap puller rather than your fingers.
Place the puller over the keycap and pull straight upward with gentle pressure. Twisting or pulling at an angle can damage the switch underneath. Work methodically, removing keys one row at a time.
Larger keys such as the spacebar, enter, and shift often have stabilizers. These keys require extra care when removing and reinstalling. Pull slowly and evenly to avoid snapping plastic clips or bending metal stabilizer wires.
How to Clean Keycaps Thoroughly
Once removed, keycaps can be cleaned independently from the keyboard, allowing for a more thorough process. Place them in a bowl of warm water mixed with a small amount of mild dish soap.
Let the keycaps soak for at least 30 minutes to loosen oil buildup and grime. After soaking, gently scrub each keycap using a soft brush or cloth, paying attention to the sides and underside where residue often collects.
Rinse the keycaps thoroughly with clean water to remove soap residue. Spread them out on a towel and allow them to air dry completely. This step is critical—reinstalling damp keycaps can introduce moisture into the switches and cause damage.
Cleaning the Keyboard Plate and Interior Surface
With the keycaps removed, you gain full access to the keyboard plate and interior surface, where dust and debris tend to accumulate heavily.
Start by using compressed air to remove loose particles. Hold the keyboard at an angle to allow debris to fall away rather than settle deeper inside. Use a soft brush to dislodge stubborn dirt caught around switch housings.
For sticky residue or grime, lightly dampen a cotton swab with isopropyl alcohol and gently wipe the affected areas. Alcohol evaporates quickly and is safe for electronics when used sparingly. Avoid letting liquid pool or drip into the switches.
How to Clean Mechanical Switches Safely
Mechanical switches are delicate compared to keycaps and the keyboard case. In most situations, they do not require direct liquid cleaning.
Compressed air is usually sufficient to remove dust from switch housings. Blow air around the stem and housing, not directly inside the switch. If a switch feels sticky, a lightly dampened cotton swab can be used around the exposed stem area only.
Opening switches for internal cleaning is an advanced procedure and should only be attempted by experienced users. Improper reassembly can permanently alter switch feel or cause malfunction.
Deep Cleaning the Keyboard Case
Deep cleaning involves opening the keyboard case, which exposes internal components such as the PCB. This step is optional and should only be done if you’re comfortable working with electronics.
After removing keycaps and unscrewing the case, separate the top and bottom shells carefully. Clean each part individually using a microfiber cloth or soft brush. Avoid touching electronic components with wet tools.
If the keyboard has experienced a spill, deep cleaning becomes essential. Ensure all components are completely dry before reassembly. Patience during this step can prevent irreversible damage.
Common Cleaning Mistakes and How to Avoid Them
One of the most frequent mistakes is using too much liquid. Mechanical keyboards are not waterproof, and moisture trapped inside switches can cause corrosion or electrical failure.
Another mistake is rushing the drying process. Even if parts appear dry on the surface, internal moisture may remain. Allow sufficient drying time, especially for keycaps.
Using harsh cleaners or abrasive materials is also risky. These can damage keycap legends, scratch surfaces, or degrade plastic over time. Gentle tools and controlled methods always yield better results.
How to Keep Your Mechanical Keyboard Clean for Longer
Preventive habits significantly reduce how often deep cleaning is necessary. Washing your hands before typing minimizes oil transfer. Avoid eating directly over your keyboard whenever possible.
Keeping your workspace clean reduces airborne dust. Using a desk mat can prevent debris from transferring from your desk surface to the keyboard. Some users also cover their keyboard when not in use, especially in dusty environments.
Consistency is key. Small, regular efforts make maintenance easier and protect your keyboard over the long term.
The Impact of Dirt on Typing Performance and Accuracy
A mechanical keyboard is engineered to provide consistent actuation and feedback, but dirt accumulation directly interferes with this precision. When dust and debris settle around switch stems, they create resistance that alters the way keys move. Over time, this resistance can lead to uneven keypresses, delayed actuation, or incomplete resets.
Typing accuracy suffers when switches no longer behave consistently. You may notice that some keys require more force, while others feel lighter or unresponsive. This inconsistency forces your fingers to subconsciously adjust, increasing fatigue and the likelihood of errors during long typing sessions.
For gamers, this issue becomes even more noticeable. Competitive gameplay relies on split-second inputs, and a dirty switch can mean the difference between a registered command and a missed action. Keeping switches clean ensures predictable behavior, which is essential for both productivity and performance.
How Dust and Humidity Accelerate Keyboard Wear
Environmental factors play a significant role in how quickly a mechanical keyboard becomes dirty. Dust-heavy environments introduce fine particles that easily settle inside switch housings. Once inside, these particles act like abrasives, slowly wearing down internal components.
Humidity adds another layer of risk. Moisture in the air can combine with dust and oils, forming sticky residues that are harder to remove. Over time, this mixture can cause corrosion on metal contacts inside switches, reducing electrical reliability.
If you live in a humid or dusty environment, more frequent cleaning is not optional—it’s necessary. Controlling airflow, keeping windows closed during dusty periods, and using a dehumidifier can significantly slow down wear and extend the lifespan of your keyboard.
Differences Between Cleaning Hot-Swappable and Soldered Keyboards
Not all mechanical keyboards are built the same, and cleaning approaches can vary depending on the design. Hot-swappable keyboards allow switches to be removed without soldering, making deep cleaning more accessible for advanced users.
With hot-swappable boards, switches can be taken out individually, allowing thorough cleaning of both the switch housings and the keyboard plate. This flexibility makes it easier to address stubborn dirt and perform preventive maintenance.
Soldered keyboards, on the other hand, require a more conservative approach. Switches cannot be removed without specialized tools and technical knowledge. For these keyboards, regular surface cleaning and careful use of compressed air become even more important to prevent dirt from reaching critical internal areas.
How Stabilizers Affect Cleaning and Maintenance
Stabilizers are used on larger keys to ensure smooth and even movement. While essential for typing comfort, they introduce additional components that can trap dirt and grime.
Unclean stabilizers often cause rattling noises, sluggish key movement, or uneven presses. Dirt buildup around stabilizer wires and housings is a common cause of these issues.
Cleaning stabilizers involves wiping exposed parts with a lightly alcohol-dampened cotton swab and removing debris with a soft brush. For advanced users, stabilizers can be removed and relubricated during deep cleaning, but even basic cleaning significantly improves key feel and sound.
Why Lubrication Should Follow Cleaning, Not Replace It
Some users attempt to fix scratchy or noisy switches by lubricating them without cleaning first. While lubrication can improve smoothness, it should never replace proper cleaning.
Applying lubricant over dirt traps debris inside the switch, making the problem worse over time. Dust mixed with lubricant creates a paste-like residue that accelerates wear and reduces switch lifespan.
Cleaning removes contaminants, while lubrication enhances performance. When used together correctly, they restore switches to near-original condition. When used incorrectly, lubrication can permanently degrade switch feel.
How Food and Drink Spills Cause Long-Term Damage
Even small spills can have serious consequences for a mechanical keyboard. Sugary drinks, coffee, and sauces leave behind residues that attract dust and harden over time.
These residues interfere with switch movement and can corrode electrical contacts. Unlike dry dust, liquid-based contaminants often require immediate and thorough cleaning to prevent permanent damage.
If a spill occurs, quick action is critical. Disconnect the keyboard immediately, remove keycaps, and dry all accessible areas. Delayed response dramatically increases the risk of irreversible damage.
Cleaning Mechanical Keyboards Used in Shared Workspaces
Keyboards used in shared environments accumulate dirt faster due to multiple users and varying hygiene habits. Oils, sweat, and debris build up unevenly across frequently used keys.
In these situations, more frequent surface cleaning is essential. Disinfecting keycaps with alcohol-based solutions helps reduce bacteria without damaging materials when done correctly.
Shared keyboards also benefit from scheduled deep cleaning, as accumulated grime tends to spread deeper into the keyboard over time. Regular maintenance ensures consistent performance and improved hygiene for all users.
How Keyboard Layouts Influence Dirt Accumulation
Compact keyboard layouts, such as 60% or 65% designs, tend to accumulate dirt differently than full-size keyboards. Smaller layouts concentrate usage into fewer keys, increasing localized wear and grime.
Full-size keyboards, while larger, often trap debris in less frequently used areas like the number pad or function row. These areas are commonly overlooked during cleaning.
Understanding your keyboard’s layout helps prioritize cleaning efforts. High-use zones should receive more frequent attention, while less-used areas still require periodic maintenance to prevent long-term buildup.
Traveling With a Mechanical Keyboard and Cleaning Considerations
Mechanical keyboards are increasingly used by remote workers who travel frequently. Transportation exposes keyboards to dust, lint, and pressure that can force debris deeper inside.
Using a protective case during travel significantly reduces contamination. After travel, a light cleaning session helps remove particles picked up during transit.
Travel-friendly cleaning routines focus on compressed air and microfiber cloths, allowing maintenance without full disassembly. This approach keeps the keyboard functional between more thorough cleanings at home.
How Regular Cleaning Preserves Keyboard Sound Profile
Mechanical keyboard enthusiasts often value sound as much as feel. Dirt buildup alters acoustics by introducing unwanted friction and dampening vibrations unevenly.
Clean switches produce consistent and predictable sound. Dirty switches may sound muted, scratchy, or inconsistent across the keyboard.
By maintaining cleanliness, you preserve the original sound signature of your keyboard. This is especially important for users who have customized their setup for specific acoustics.
When Cleaning Is Not Enough and Repairs Are Needed
Sometimes cleaning alone cannot restore a keyboard to proper condition. Switches that have been damaged by corrosion or excessive wear may need replacement.
Recognizing when cleaning stops being effective is important. Persistent unresponsiveness, severe chatter, or visible corrosion indicate deeper issues.
In these cases, replacing individual switches or consulting a professional repair service may be the best solution. Regular cleaning reduces the likelihood of reaching this point.
Building a Long-Term Maintenance Routine
The most effective way to care for a mechanical keyboard is consistency. Establishing a maintenance routine ensures that dirt never reaches damaging levels.
Light cleaning every one to two weeks, combined with scheduled deep cleaning, keeps the keyboard in optimal condition. This approach minimizes effort while maximizing longevity.
Treating keyboard maintenance as a habit rather than a chore transforms cleaning into a simple, preventive practice that protects both performance and investment.
Conclusion
Cleaning a mechanical keyboard is not a complicated task, but it does require care, patience, and the right approach. Regular cleaning preserves switch performance, improves typing comfort, and extends the lifespan of your keyboard.
By understanding when to perform surface cleaning versus deep cleaning, you can maintain your keyboard without unnecessary risk. Proper tools and gentle techniques ensure that every component remains intact and functional.
A clean mechanical keyboard delivers a better typing experience every day. With the steps outlined in this guide, you can keep your keyboard performing at its best for years to come.
Frequently Asked Questions
Can I clean my mechanical keyboard without removing keycaps?
Yes, surface cleaning with compressed air and a microfiber cloth is effective for routine maintenance, but it won’t remove deep dirt.
Is it safe to wash keycaps with water?
Yes, as long as you use mild soap and allow them to dry completely before reinstalling.
Can I use disinfectant wipes on my keyboard?
Only alcohol-based wipes without excess moisture. Avoid wipes containing bleach or strong chemicals.
How long should keycaps dry after washing?
At least 6 hours, though overnight drying is recommended to ensure all moisture has evaporated.
What should I do immediately after spilling liquid on my keyboard?
Unplug it immediately, remove keycaps, dry all components thoroughly, and avoid using it until completely dry.